Art of Mobile App Development:
Building Your Own iOS Framework - An In- Depth Tutorial

In this article, we will cover many topics such as the basics of how to generate a framework, modularization, and documentation. Lately, I have been exploring the world of iOS frameworks, having read many articles, watched several tutorials and learned a lot from the amazing iOS community on different platforms, I decided to share my newly acquired skills with you, in the form of a short series of posts.
Below explanation will serve the purpose of an introduction, so let's start by defining a framework.
![]() A software framework is an abstraction in which software, providing generic functionality, can be selectively changed by additional userwritten code, thus providing application-specific software. It provides a standard way to build and deploy applications and is a universal, reusable software environment that facilitates the development of software applications
A software framework is an abstraction in which software, providing generic functionality, can be selectively changed by additional userwritten code, thus providing application-specific software. It provides a standard way to build and deploy applications and is a universal, reusable software environment that facilitates the development of software applications
So how can we translate that into the apple ecosystem ? Here's a more suitable definition :
![]() Frameworks are bundles that contain a linkable library (usually a dylib) and the associated resources and headers for development.
Frameworks are bundles that contain a linkable library (usually a dylib) and the associated resources and headers for development.
There are two types of binary frameworks :
a) Universal frameworks
b) XCFrameworks
Universal Frameworks :
A universal framework ( also called Fat framework ) is the combination of two different versions of .framework files :
1) Real devices version : armv7, armv7s, arm64
2) Simulator version : x86_64, i386
The reason we have to use two separate versions is due to the difference in architectures.
While Fat frameworks are a good solution for development purposes, they lack the ability to support multiple platforms such as iOS, Mac OS, WatchOS.
| Starting in Xcode 12.3, Fat frameworks cannot be used anymore. This series will obviously focus on XCFrameworks.
Art of Mobile App Development:
XCFrameworks are the new and official form of distributing binary frameworks in the Apple platforms, they were introduced to the world in 2019 to solve many ongoing inconveniences that developers were facing. They provide common roof for different OS variants of the framework and work perfectly with both physical devices and simulators. You can for example have a variant that uses UIKit for iOS interfaces and AppKit for MacOS interfaces.
In addition, XCFrameworks can also bundle up static libraries and their corresponding headers, and yes, XCFrameworks support binary distribution of Swift and C-based code!
XCFrameworks are also easily distributed using Apple’s first party dependency manger Swift Package Manager ( SPM ).
Art of Mobile App Development:
People build frameworks to help the community by building useful blocks of code and distribute it to others so they can use it directly without having to rewrite all that logic again.
It is very useful in the software industry, you can always rely on others and open source libraries/frameworks that other have invested a great time perfecting & testing for other to use, and we as software engineers we should leverage that when it is convenient for us.
In large teams, people build frameworks to modularize the work which helps large teams to split up the work and smaller teams can work in isolation. Also to be able to reuse the same component/framework in different apps within the company without having to rewrite or copy/paste that code from a place to place.
In this article I'll cover how you can build your framework and test it using xcode.
Create the Framework source code
I have used the Xcode Version 14.2(14C18) while creating the framework.
Open xcode and start with a framework project.
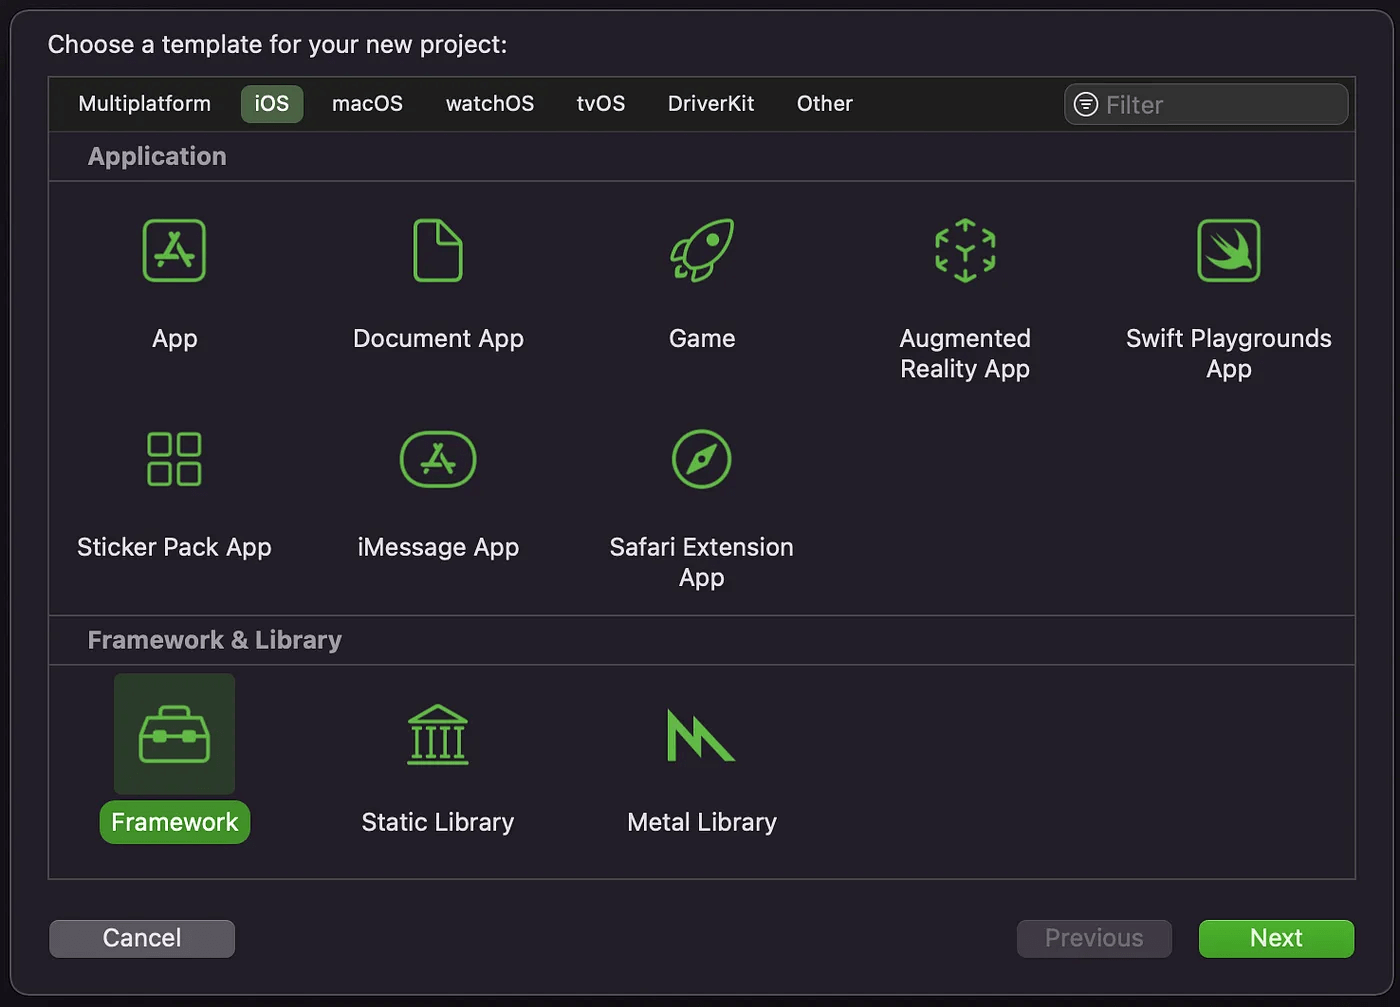
Instead of the usual choice of selecting "App" as the template of your project, this time, we will select the Framework option from the Framework & Library Section.
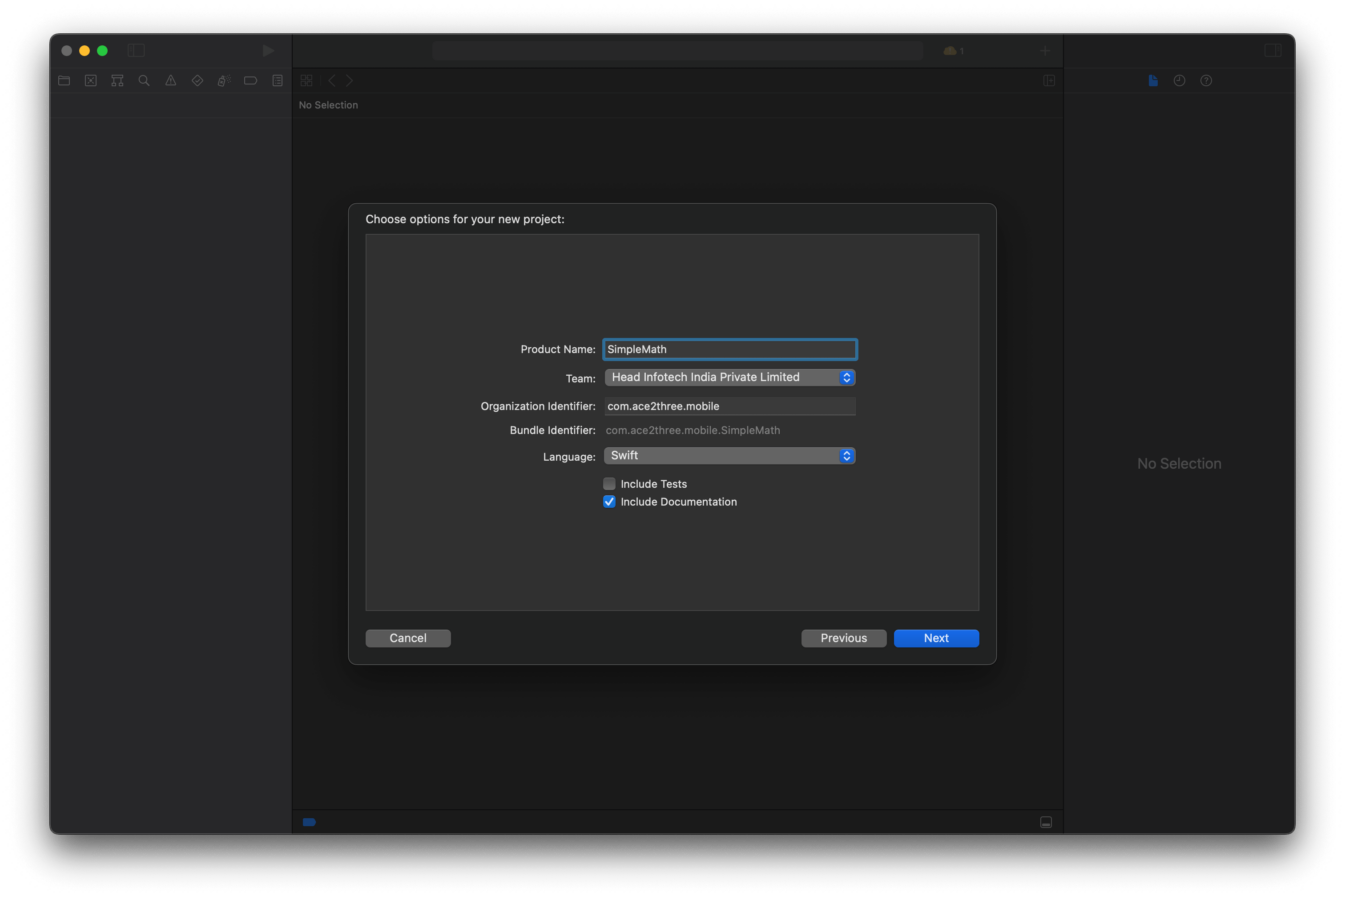
I'll name mine as SimpleMath, you can choose whatever you want, and I'll save it to my desktop so I can easily access it later when I'm building the xcframework.
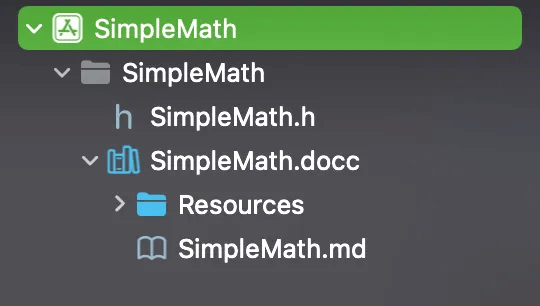
Let's take a look at the project's structure, by default, a framework only contains an objective-c header file (despite picking swift as the programming language) and since I checked the "include documentation" option, Xcode automatically generated a DocC catalog too.
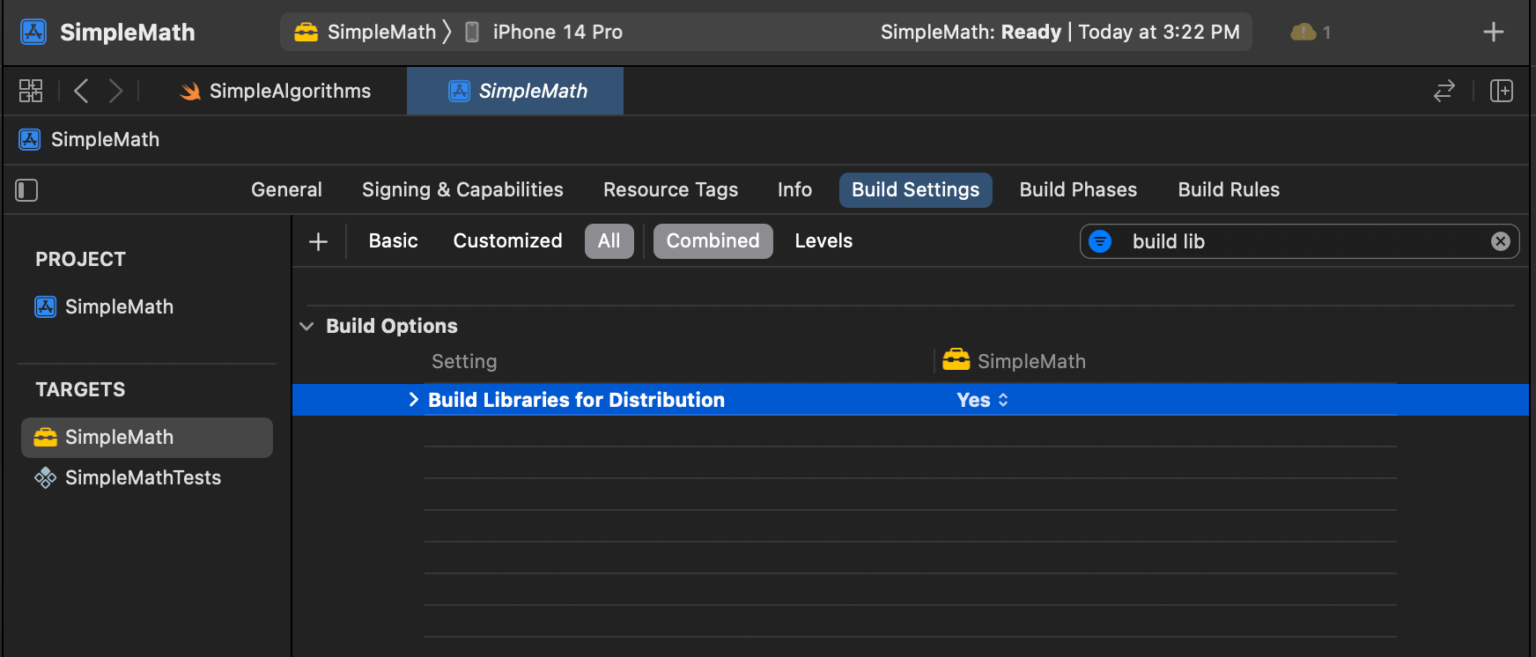
Now, go to build settings and change the Build Libraries for Distribution to YES.
Let's create a new swift file, title it SimpleAlgorithms, the following class will contain some mathematical functions.
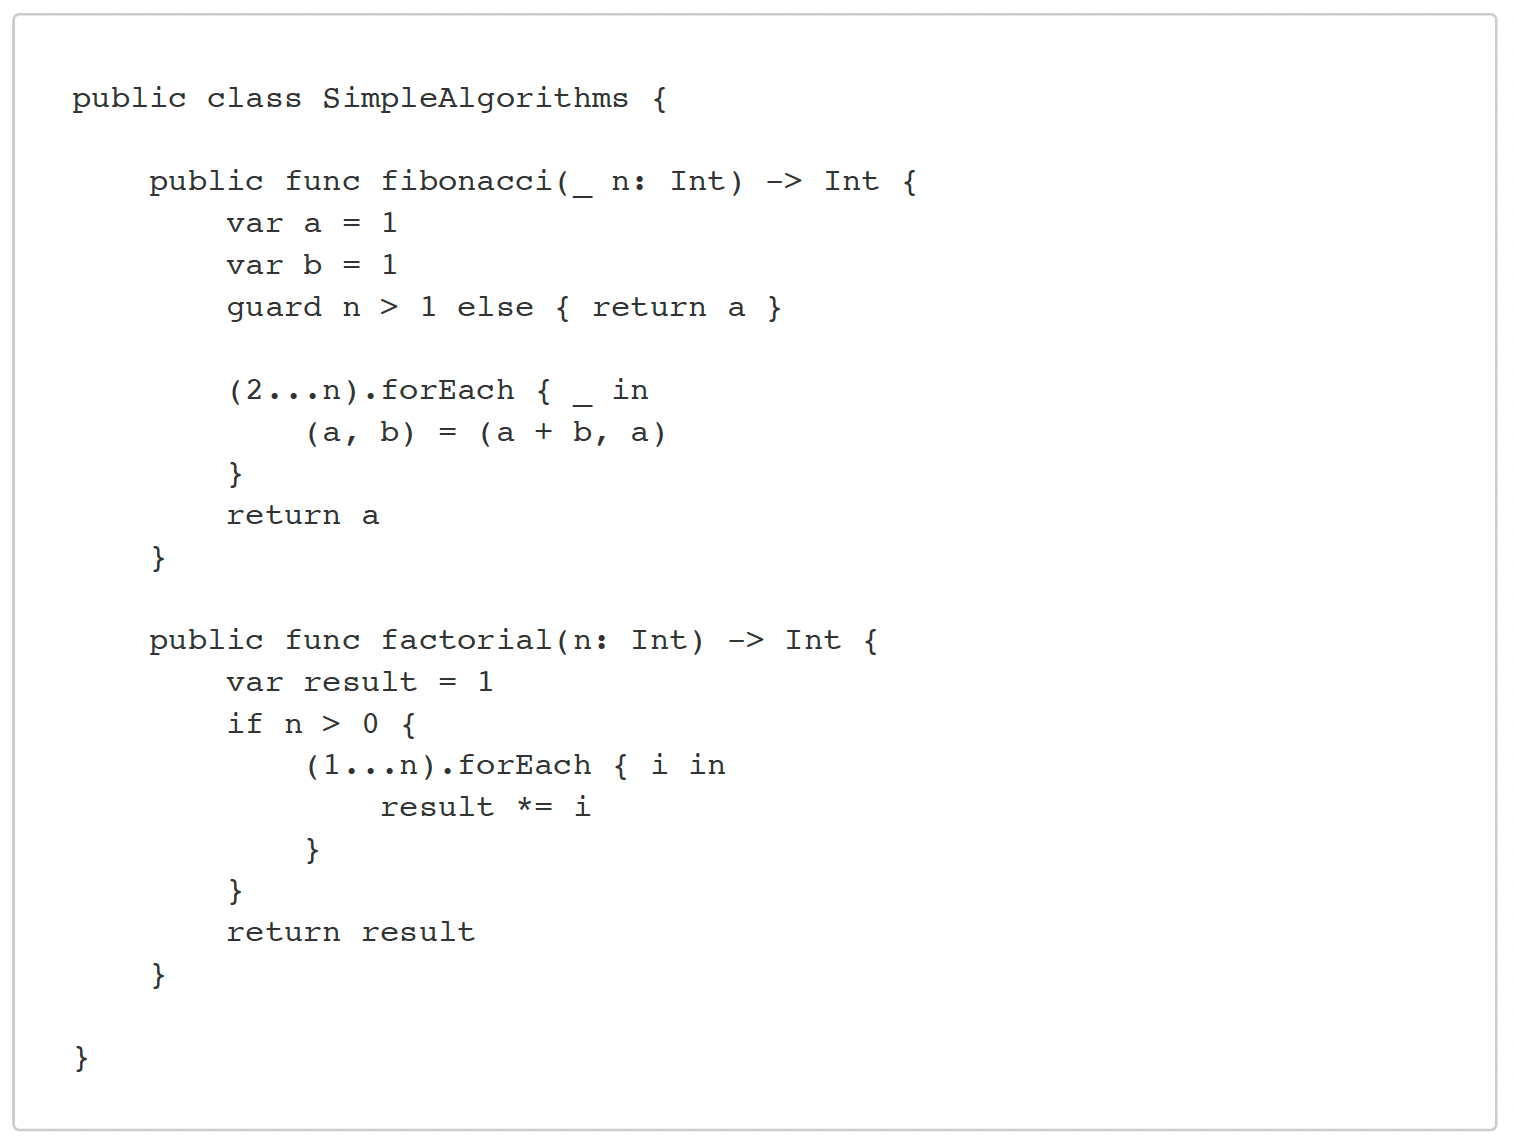
Access control is something every programmer should know about, especially when developing a framework/ library.
In this example, I'm purposefully using the public access control keyword to declare my class and my functions.
In Swift, there are 5 access control specifiers: open, public, internal, private, and fileprivate. If left unspecified, "internal" will be used by default.
| Internal classes and members can be accessed anywhere within the same module(target) they are defined
Since our framework is separate from the apps where it will be used, not specifying the public access control keyword means that our class or function or even our variable won't be accessible to the developers, so keep this in mind.
| Add the required classes to the framework project. There will be 2 ways based on the language of your Xcode project:
A) If the creating framework is in Objective c and the adding classes are also in objective c, then you need to import those classes in the Header file to expose to the consuming application.
B). If the creating framework is in Swift and the adding classes are also in swift then you need to declare those classes as public.
What ever the classes we are going to expose to the consuming application, we need to add them in to the Public section under Build Phases.
If your frame work is having any dependency with third party libraries then you have to install dependent pods and then need to open the workspace by closing the already opened Xcode project.
So what's next?
The next step is to archive our framework, we will create two different archives, one for iOS devices and another one for simulators, then, we will combine these two archives into one XCFramework.
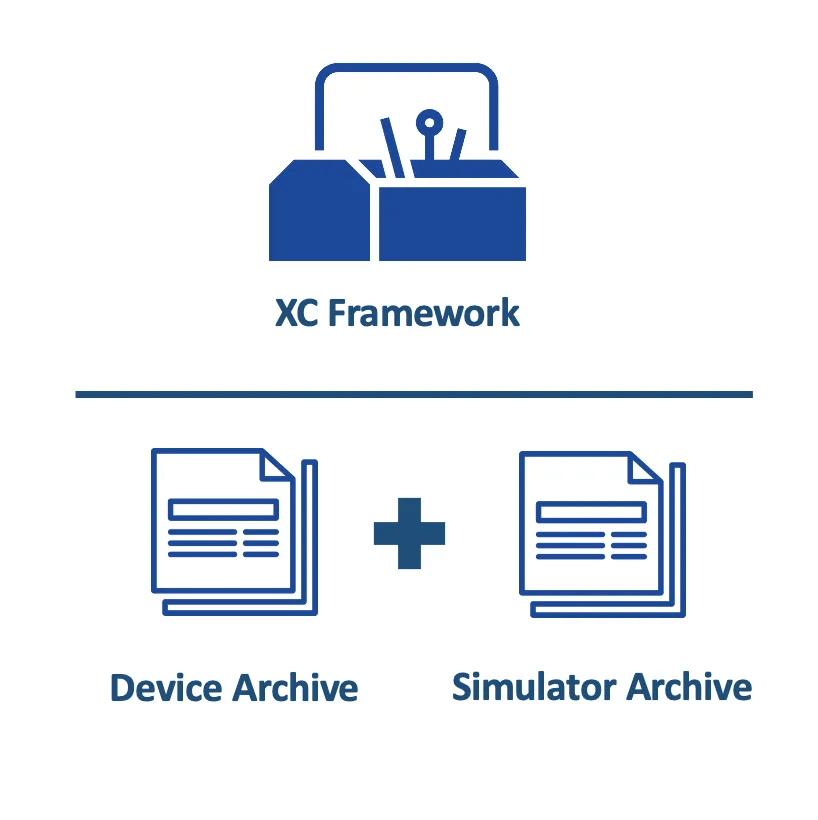
Archiving the framework :
Although it is possible to archive directly using Xcode, using Terminal is recommended.
First things first, navigate to your project's folder either by using the cd command or by right-clicking on the folder -> Services ->New terminal at the folder
Then paste this commend into your terminal, I'll explain it in a second :
If you are creating the framework for real device from the Xcode project which is not having any dependencies with third party libraries

If you are creating the framework for real device from the workspace project which is having the dependency with a third party library:

I have to clarify something to avoid confusion, this is just one long commend, to make it more human-readable you can break it into multiple lines by using the backslash character ( \ )
1. The destination option defines the target OS ( and whether a simulator )
2. The archivePath option means where the archive will be stored
3. Setting skip install to No will install the framework to archive
4. Build_Library_For_Distribution will make the framework inside the archive distributable
5. The workspace option defines the name of the workspace from where the framework is being generated
To build our XCFramework, the first four options are needed, so don't skip any one of them. The fifth one will come into picture if you are generating the framework from the workspace.
| Generating an archive should take only a few seconds, this duration will increase as your project gets bigger ( especially when you include other third-party frameworks inside your framework )
To achieve the same result for the simulator version of the archive, repeat the same commend, but this time, change the destination to "generic/platform=iOS Simulator" and the archivePath to archives/SimpleMath-Simulator ( name it whatever you want, as long as it is a significative name and is different from the other archive's name).
If you are creating the framework for simulator from the Xcode project which is not having any dependencies with third party libraries:

If you are creating the framework for simulator from the workspace project which is having the dependency with a third party library:

Building the XCFramework :
And finally, navigate to the "archives" folder ( located next to your project folder ) the following command will allow you to merge your archives and create an XCFramework :
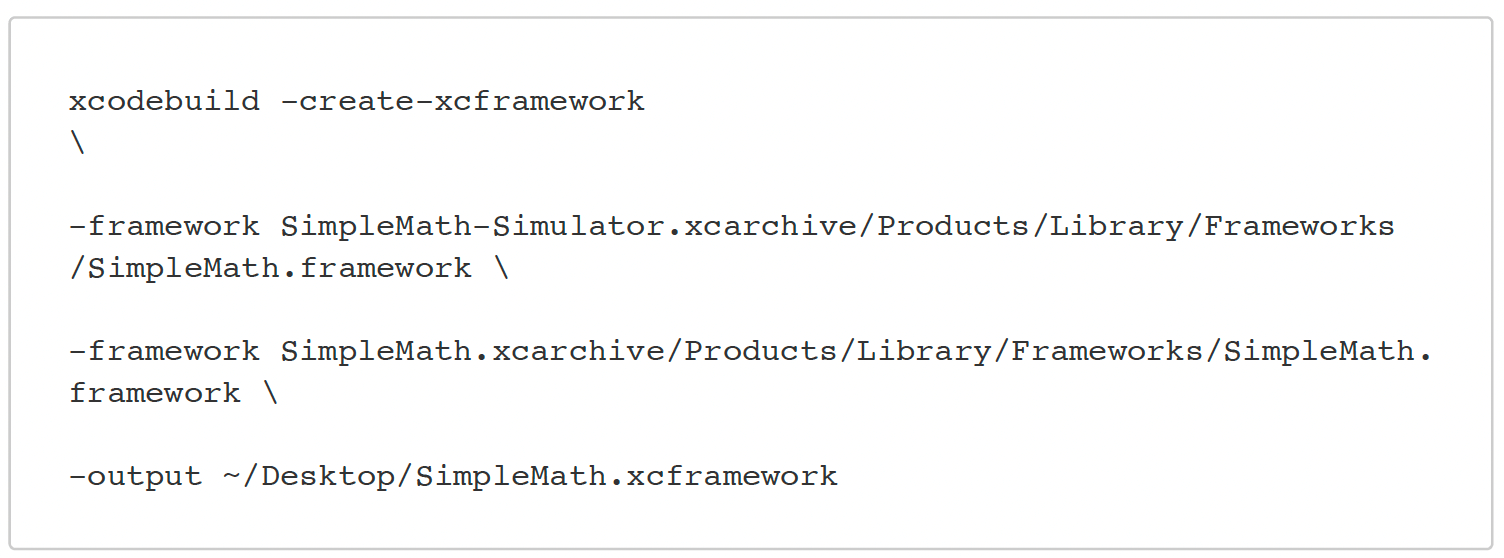
xcodebuild allows us to include many frameworks with different architectures/platforms, in this case, we only included two frameworks ( iOS and iOS simulator ) but we could also include other variants of the framework like a MacOS version as another parameter.
With the above command, one framework will be created on your desktop.
| Unlike the XCArchive files, an XCFramework cannot be overwritten. Before using the xcodebuild command for a second time, you have to delete the previous XCFramework and then run the command … It's just a slight inconvenience, not a big deal!
Importing the XCFramework to a project :
The last step is to import the framework to an iOS app, it should be a piece of cake, to demonstrate this, let's quickly create a new iOS app project.
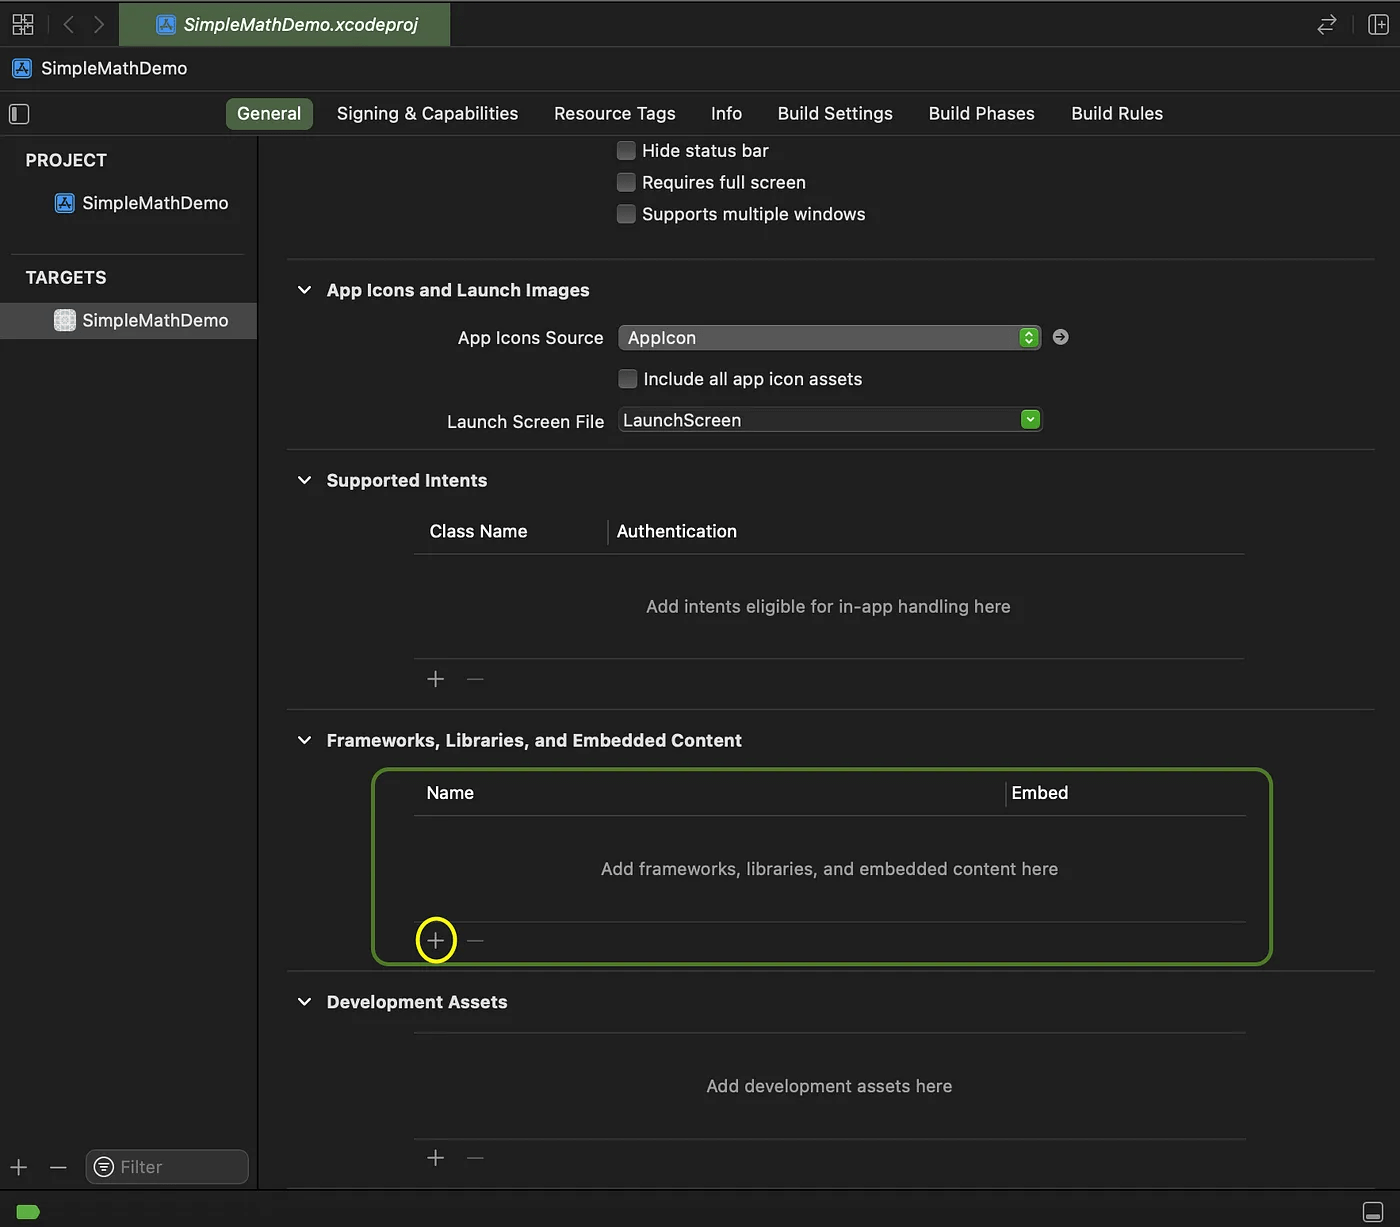
After creating the demo app project click on the plus (+) button in the Frameworks section of your app target, select the "add another" option in the bottom left corner, then click on "add files…" and finally select your framework … You can also ignore what I just said and simply drag and drop it, what matters is that you can see the blue XCFramework icon.

![]() If your framework is having any pod dependencies then please add those frameworks also into the Demo app under above mentioned section(For this, you need to open your SimpleMath.xcframework in the Finder where you can see the dependent frameworks like AFNetworking, FBSDK, Lottie, etc).
If your framework is having any pod dependencies then please add those frameworks also into the Demo app under above mentioned section(For this, you need to open your SimpleMath.xcframework in the Finder where you can see the dependent frameworks like AFNetworking, FBSDK, Lottie, etc).
Now go to your View Controller, and let's import our framework, once we have done that we will have access to our Simple Math functions
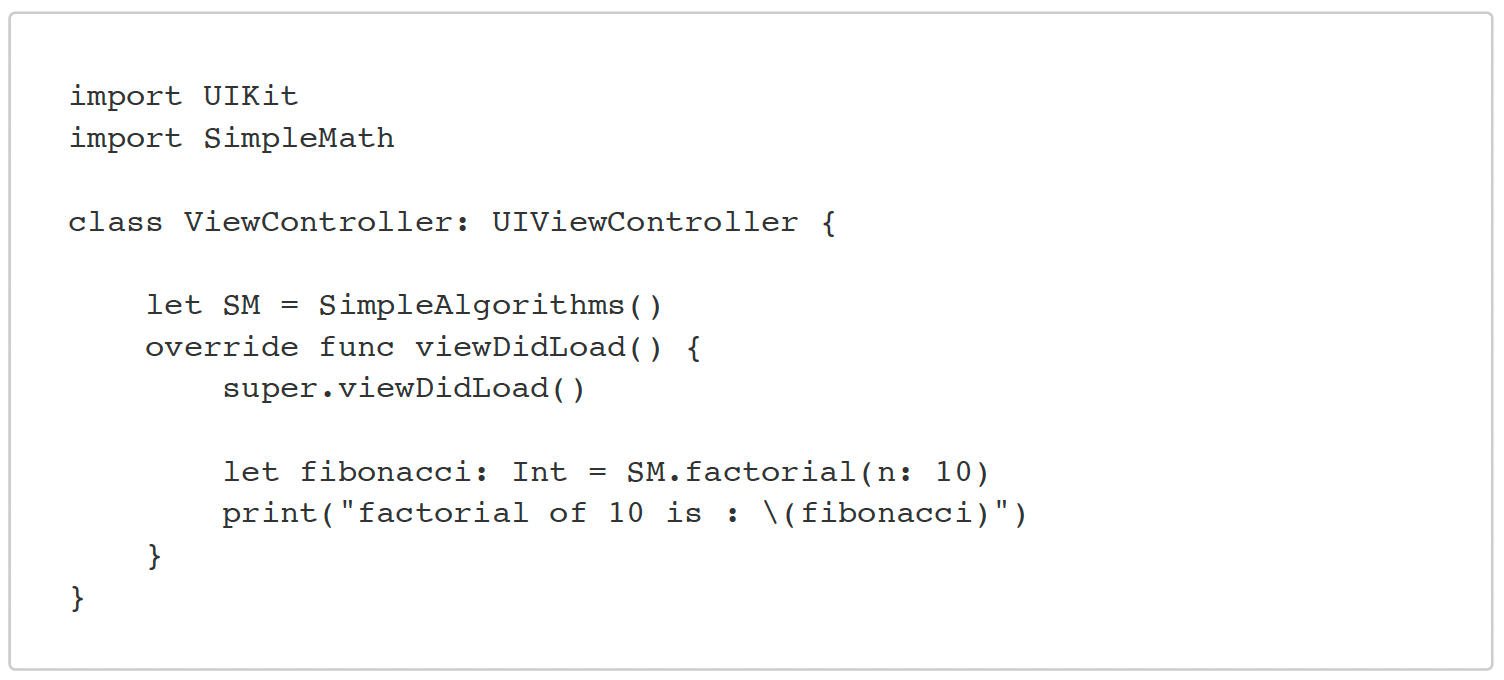
Now, run it on both simulator and real device and it should run and give you the same results once the app loads. Congratulations, you have just imported your first ever framework into an app!
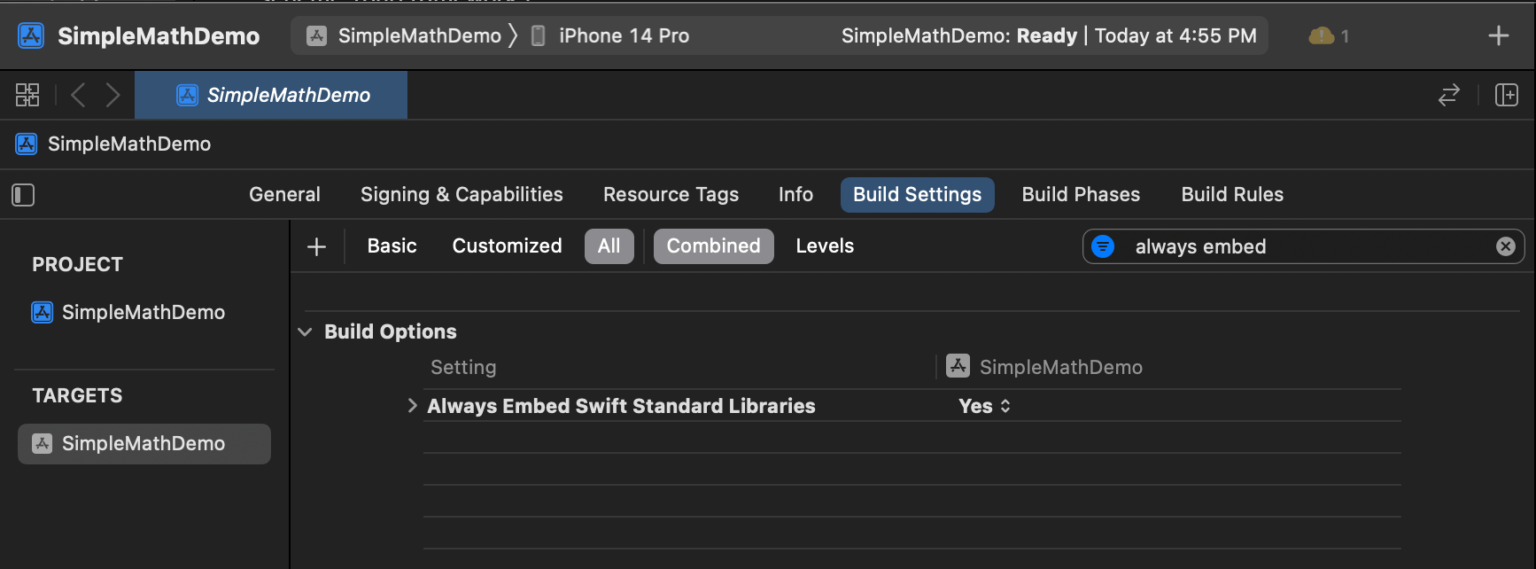
If you are still having issues while running the Demo app, then please follow the below mentioned additional step.
1.Open the build settings of your Demo app and set "Always Embed Swift Standard Libraries" to YES
2. Now, go to Build phase and click on + button on top left corner. Select New Copy files Phase then a new section will be created with name "Copy Files". Go to that section and change the destination to Frameworks and add the SimpleMath.xcframewok as well as other dependent frameworks(Like AFNetworking, FBSDK, Lottie, etc if there are any).
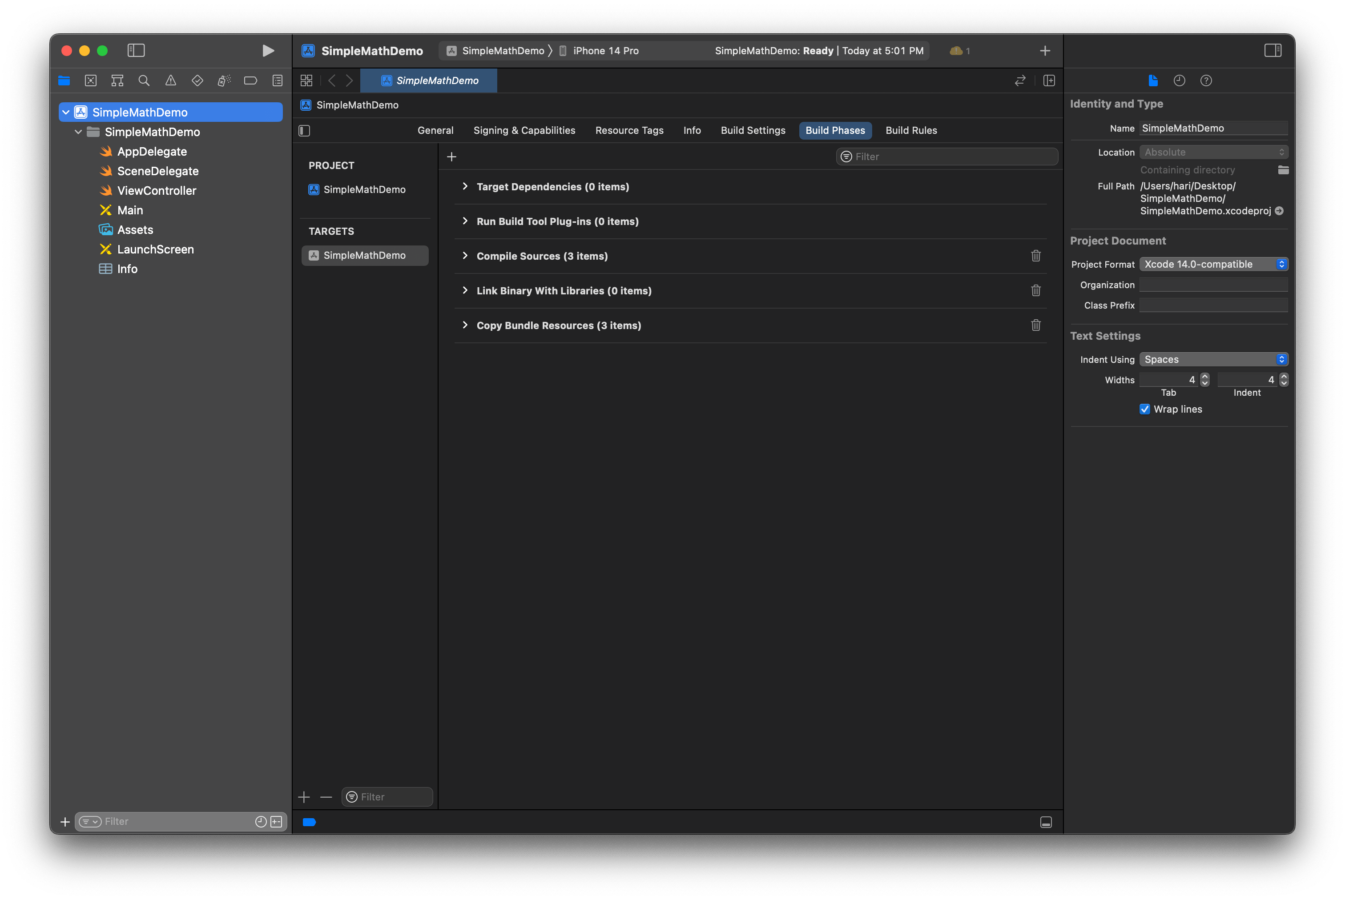
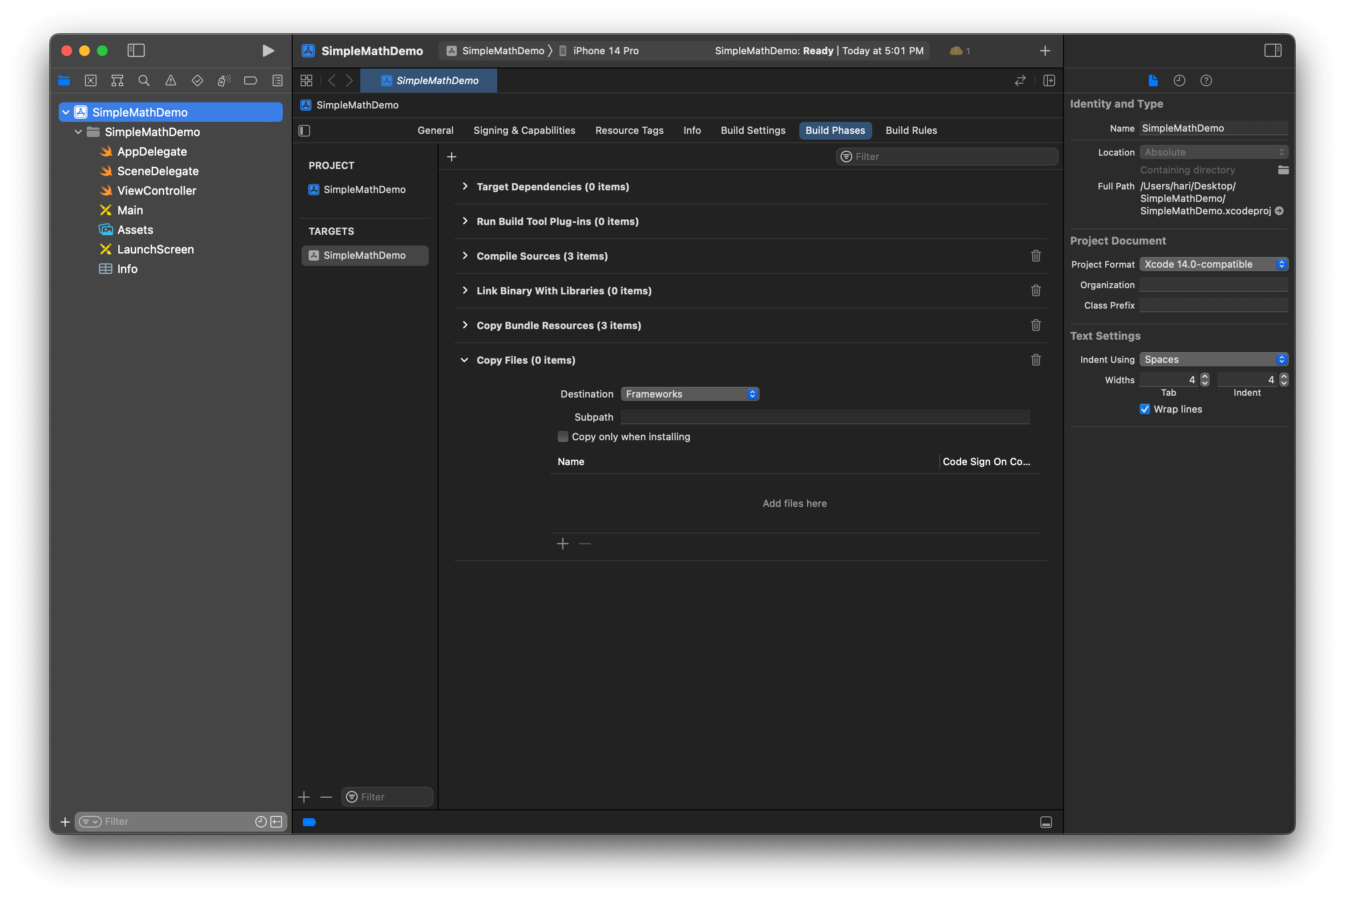
Now try to run the Demo app, it should run and give you the same results once the app loads
Conclusion :
In this post, we created a framework, built it, and then successfully added it to a demonstration app.
Thanks for Reading 🙂
Written by Hari Babu Valeti